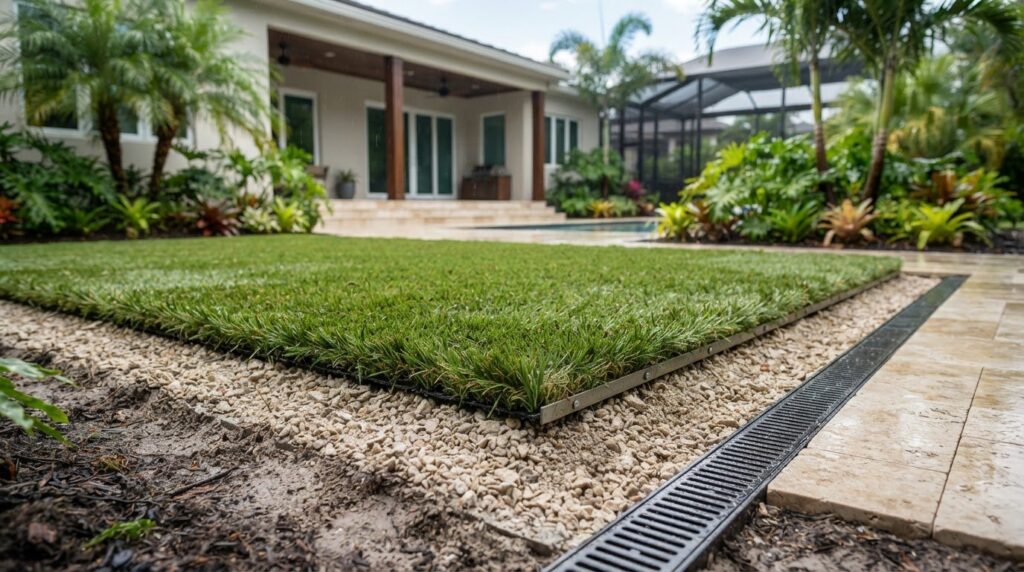
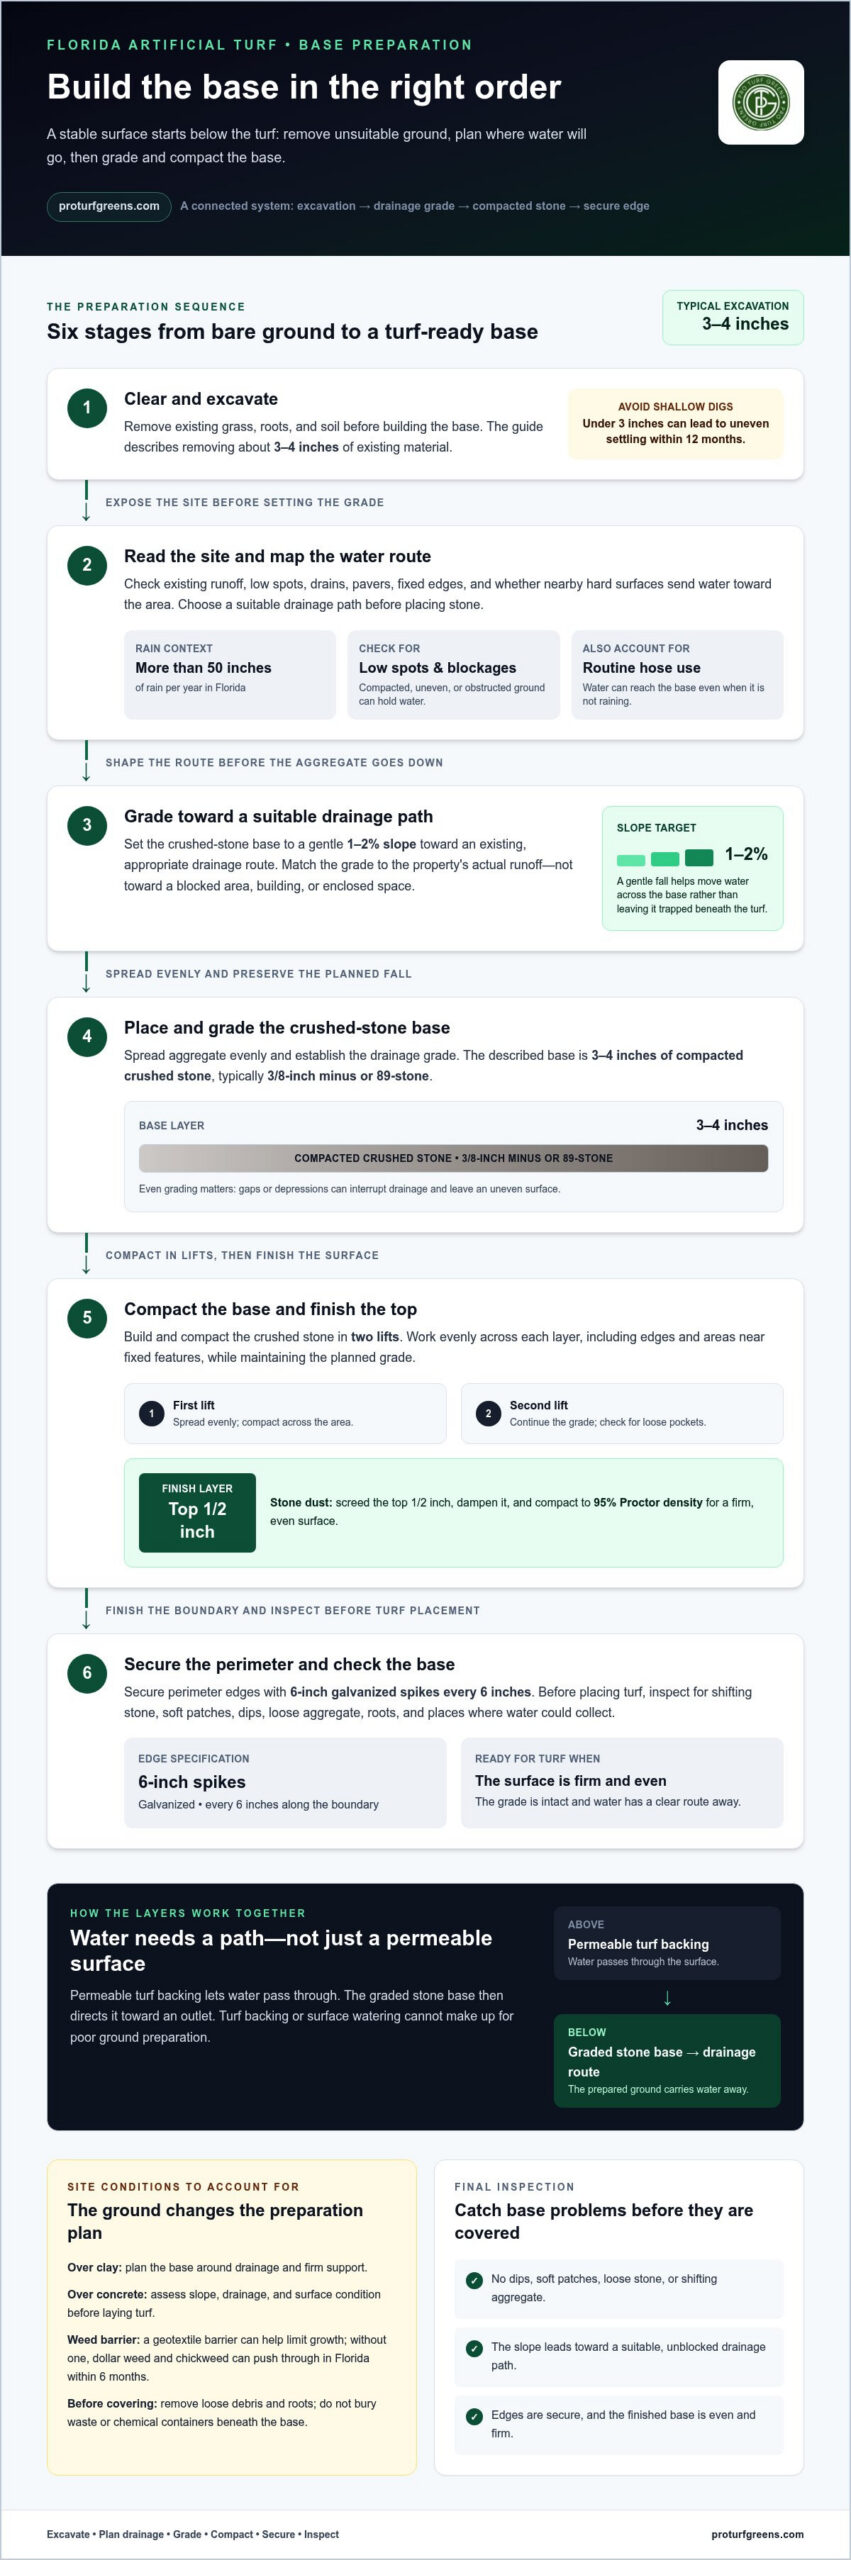
The ground beneath artificial turf does more work than the surface above it. For artificial turf base preparation in Florida, the process typically removes 3-4 inches of existing grass, soil, and roots, then builds a 3-4-inch compacted crushed-stone base with a 1-2% slope toward a drainage path. Careful excavation, grading, compaction, and secure edging help create a stable foundation for the finished surface.
A smooth-looking lawn is only part of a successful installation. In South Florida, rainfall and drainage conditions make the work beneath artificial turf especially important. Shortcuts can lead to settling, uneven areas, or water that does not drain as intended. Proper preparation helps protect the finished surface and how it functions.
This guide explains how excavation, drainage planning, base materials, compaction, and perimeter edging work together. You’ll learn what each step does, which site conditions affect preparation, and how to assess whether an installation plan suits your yard or recreational area.
Key Takeaways
- Remove existing grass, roots, and soil before building the base; shallow excavation can contribute to uneven settling.
- Plan the grade and drainage route before placing crushed stone so rainwater has a clear path away from the turf.
- Compact the base in layers and secure the perimeter to help the installation stay stable through changing weather.
- Match the turf project to how the space will be used, whether for a lawn, pet area, play space, or putting green.
Base preparation and drainage engineering
A stable turf base helps manage water before it reaches the finished surface. In Florida, drainage planning starts with the soil, the site’s slope, and the route water can follow.
Florida Rainfall and Drainage Challenges
Florida receives more than 50 inches of rain per year, so heavy rain can expose weak drainage quickly. Low spots may hold water when the ground is compacted, uneven, or blocked by surrounding landscaping. Inspect where runoff currently travels and whether nearby hard surfaces direct water toward the proposed turf area. Those observations guide the grading plan.
Routine hose use also adds moisture, even when it isn’t raining. Permeable turf backing lets water pass through the surface, but the backing alone cannot carry water away from the site. The prepared ground beneath it needs a clear drainage path. Consider the turf’s intended use and nearby drainage routes when planning the layout.
Drainage Slope and Layers
Grade the crushed-stone base with a 1-2% slope toward existing drainage paths. This gentle fall helps move water across the base instead of leaving it trapped beneath the turf. Check the direction of the slope against the property’s actual runoff routes, including drains and lower ground. A slope aimed at a blocked or unsuitable area won’t solve pooling.
The described base uses 3-4 inches of compacted crushed stone, typically 3/8-inch minus or 89-stone. Spread the aggregate evenly, establish the drainage grade, then compact it to create a firm layer. Stone size and consistent grading matter because gaps or depressions can disrupt drainage and create an uneven surface.
Think of the layers as one connected system: permeable turf backing lets water through, while the graded stone base directs it toward an outlet. Surface watering or turf material cannot compensate for poor ground preparation. Before installation, inspect the base for dips, loose aggregate, and slopes that could direct runoff toward buildings or enclosed areas.
Artificial turf installation in South Florida
Installation involves site preparation, a graded base, turf placement, and finishing materials. The sequence and project scope determine how the work is planned for residential and commercial sites.
Site Preparation, Grading, and Base Installation
Start by clearing the installation area and identifying drains, pavers, and fixed edges. Grade the exposed ground toward a suitable drainage route before adding base material. This allows the installer to assess the underlying surface and address low spots before they are covered. On commercial sites, map access and work zones to fit the property’s layout.
Sand and Gravel Base Installation
After grading, spread several inches of sand and gravel base, then compact it firmly. Build and compact the material in controlled layers rather than leaving loose pockets beneath the artificial grass. A screeded finish helps create an even surface for turf placement. Infill is added during finishing, not as a substitute for a stable base.
Installation Timelines
Residential project schedules depend on the area’s size, access, removal needs, and drainage work. An open yard differs from a site with pavers, restricted access, or extensive base preparation. Commercial projects may also require coordination around larger work areas and ongoing site use. Ask for a clear sequence covering excavation, grading, base installation, turf placement, and finishing.
Florida Installation Decisions
Permit requirements and local rules depend on the municipality and project scope; grading or drainage changes are key details to identify. Base-preparation pricing is case-specific and provided after a quote request; excavation, access, materials, and drainage work shape the estimate. A geotextile weed barrier can help limit growth: without one, dollar weed and chickweed can push through in Florida within 6 months. Common mistakes include shallow excavation, poor compaction, and blocked drainage; excavation under 3 inches can lead to uneven settling within 12 months. Over clay, plan the base around drainage and firm support. Over concrete, assess slope, drainage, and surface condition before laying turf. For paved areas, consider artificial turf driveway design.
Base compaction and secure edging for storms
A stable aggregate base supports the turf and helps maintain an even finish. Compaction, grading, and securely finished edges all matter during artificial turf installation.
Compacted Aggregate Base
Use 3-4 inches of compacted crushed stone, typically 3/8-inch minus or 89-stone. Spread the aggregate evenly across the prepared area, then shape it to the planned drainage grade. Check for soft patches, loose material, and depressions before covering the base. These flaws can affect the surface and proper drainage beneath synthetic turf.
For the final finish, screed the top 1/2 inch with stone dust. Dampen and compact this layer to 95% Proctor density. This creates a firm, even surface for the turf to rest on. Remove loose debris and roots first; don’t bury waste or chemical containers beneath the finished base.
Compaction in Two Lifts
Compact the crushed-stone base in two lifts instead of placing all the aggregate at once. Work evenly across each layer, including the edges and areas near fixed features. This helps prevent loose pockets that could settle later. Maintain the planned grade through both lifts to avoid creating unexpected dips during compaction.
After compaction, inspect the entire area before placing the turf. Look for shifting stone, uneven spots, and places where water could collect. Correcting these issues at the base stage is easier than repairing the finished surface. A firm, graded foundation supports the turf’s appearance and drainage.
Secure perimeter edges with 6-inch galvanized spikes every 6 inches. Set them along the boundary to hold the turf in place, especially around corners and transitions. For an artificial turf driveway, inspect edges beside paving and other hard surfaces. Confirm the perimeter is firmly anchored and the base remains level with adjacent areas. Proper drainage and secure edging work together, but neither replaces careful grading. Remove loose material before finishing, then check that the turf edge sits cleanly against its border.
Excavating and removing existing sod and soil
Excavation removes natural grass, roots, and loose soil before the new base is built. Careful removal also reveals ground conditions that could affect drainage or create uneven areas.
Sod and Soil Removal
Mark the installation footprint, including curves and edges. Remove existing sod, soil, and roots throughout the area, not only the visible grass. Mowing can shorten grass before removal, but it does not replace excavation. Organic material left beneath the base can break down and create soft spots. Clear the debris so the exposed ground can be graded consistently.
After clearing the site, check for standing water. Low areas or runoff paths may need attention before aggregate is added. This inspection reveals the ground beneath the former natural grass lawn.
Excavation Depth and Root Removal
The described Florida preparation process removes 3-4 inches of existing grass, soil, and roots. Excavation of less than 3 inches can lead to uneven turf settling within 12 months. The required depth also needs to leave room for the planned base and finished surface. Measure across the footprint, including edges beside paths or other fixed features.
Remove roots and organic debris rather than covering them with compacted material. Root remnants can decay and leave voids that affect the surface above. For a putting green, consistent excavation helps create a uniform foundation for shaping the finished play area.
After removal, inspect the exposed ground for soft patches, depressions, and signs of poor drainage. Correct these conditions before adding base material, or they may affect the finished turf. Account for transitions to adjoining surfaces so the installation meets the edges cleanly. This prepares the footprint for grading and compaction.
Planning a putting green? Discuss putting green base preparation as part of the project.
Pro Turf Greens: Backyard Putting Greens
Pro Turf Greens designs and installs Backyard Putting Greens for homeowners planning a dedicated practice area. When you’re ready to move from researching base preparation to planning a putting green, the team can shape the design around your yard’s layout and intended use. Sharing how you plan to use the space helps guide decisions about its footprint, contours, and placement.
Pro Turf Greens also designs and installs Playgrounds & Recreational Turf, Tee Lines & Driving Ranges, and Lawns & Pet Turf. Each project begins with the site and the role the finished turf will serve, so preparation and installation suit the space.
Contact Pro Turf Greens to discuss your backyard putting green project.
Shape Your Outdoor Space Around Its Purpose
Start by deciding how you want the finished space to function. A dedicated golf practice area calls for different design choices than a play area or a space for regular tee practice. Consider the activities, site layout, and how people will move through the yard to define a project that fits the space.
Planning artificial turf base preparation in Florida is an opportunity to connect the ground work with your broader vision. Pro Turf Greens designs and installs Backyard Putting Greens, Playgrounds & Recreational Turf, and Tee Lines & Driving Ranges, with each project planned around its intended use and setting.
Share your goals and the areas you’re considering, then explore a design direction that suits your property. Contact Pro Turf Greens today to start a conversation about your turf project and take the next step toward a space designed for the way you want to use it.
Frequently Asked Questions
How do you prepare a base for artificial turf in Florida step by step?
For artificial turf base preparation in Florida, work from site assessment through final inspection. In Fort Lauderdale or Miami, mark the turf area and note downspouts, drains, and adjoining surfaces. Remove vegetation and roots, inspect the exposed ground, then shape the grade toward a suitable drainage route. Add and compact the base material, check for low spots, and correct uneven areas before installing the turf.
What base materials and depth are recommended for artificial turf in Florida?
A common base uses 3-4 inches of compacted crushed stone, typically 3/8-inch minus or 89-stone. The described finish includes a screeded top 1/2 inch of stone dust, dampened and compacted to 95% Proctor density. Keep the aggregate consistent across the installation area. The right finished elevation also depends on nearby thresholds, pavers, and other surfaces the turf must meet cleanly.
How does Florida sandy soil affect artificial turf base preparation?
Sandy ground may drain readily, but loose or disturbed areas still need a stable, even foundation. During excavation, look for shifting soil, depressions, and places where runoff has washed material away. Grade and compact the base to support the planned turf use. For example, a frequently used play area needs firm, consistent support, not just quick drainage through the soil.
How do you handle drainage and heavy rainfall under artificial turf in Florida?
Plan a continuous route for water to leave the installation area. Florida receives more than 50 inches of rain per year, and the described base uses a 1-2% slope toward existing drainage paths. Check where roof downspouts and nearby paving send runoff, then avoid directing water toward buildings or enclosed corners. Permeable turf backing lets water pass through, but the ground beneath still needs an outlet.
How do you compact and grade an artificial turf base correctly?
Establish the drainage direction before compacting, then spread the aggregate evenly and compact it in two lifts. Keep the planned grade consistent across both layers, including edges and transitions. For the described finish, screed the top 1/2 inch with stone dust, dampen it, and compact it to 95% Proctor density. Inspect for dips or loose patches before turf installation, since these can affect the finished surface.